How To Use Roop DeepFake On RunPod Step By Step Tutorial With Custom Made Auto Installer Script
Full tutorial link > https://www.youtube.com/watch?v=jD1ZSd9aFHg


The DeepFake videos are storming the social media and now it is so easy to make. You can follow this tutorial to learn how to make your own DeepFake videos by using Roop public GitHub repository. You don't even need a computer to follow this tutorial. This tutorial will show you how to install and make DeepFake videos on RunPod. This tutorial is for only educational and research purposes.
Source GitHub File
1 Click RunPod Installer Script
https://www.patreon.com/posts/auto-installer-84511510
Our Discord server
https://bit.ly/SECoursesDiscord
If I have been of assistance to you and you would like to show your support for my work, please consider becoming a patron on 🥰
https://www.patreon.com/SECourses
Technology & Science: News, Tips, Tutorials, Tricks, Best Applications, Guides, Reviews
https://www.youtube.com/playlist?list=PL_pbwdIyffsnkay6X91BWb9rrfLATUMr3
Playlist of StableDiffusion Tutorials, Automatic1111 and Google Colab Guides, DreamBooth, Textual Inversion / Embedding, LoRA, AI Upscaling, Pix2Pix, Img2Img
https://www.youtube.com/playlist?list=PL_pbwdIyffsmclLl0O144nQRnezKlNdx3
00:00:00 Introduction to Roop DeepFake on RunPod tutorial
00:01:29 Selecting pod, template and starting installation of Roop
00:03:02 How to use automatic installer
00:03:49 How to use specific version / commit via git checkout
00:05:10 How to generate DeepFake video after installation completed
00:06:06 Continuing the manual installation
00:06:31 How to download frames folder fast with runpodctl
00:07:10 Manual installation completed
00:07:30 How to activate and use Roop DeepFake after installation
00:07:57 How to upload files from your computer very fast with runpodctl and manual way
00:09:32 Use Automatic1111 to improve face
00:10:00 How to restore faces with CodeFormer
00:10:20 How to download and use other upscalers such as UltraSharp 4x
Step-by-Step Tutorial: Installing and Using the Roop DeepFake Library on RunPod
Welcome to this comprehensive tutorial where I will guide you through the process of installing and utilizing the renowned Roop DeepFake open-source library on a RunPod. Whether you're already familiar with Roop or new to it, this tutorial is designed to provide you with clear, step-by-step instructions. Additionally, I have prepared a GitHub readme file and an easy-to-use one-click installer, which I have shared exclusively with my Patreon supporters. While the installer is not mandatory for this tutorial, your support on Patreon is greatly appreciated. Let's dive into the installation process.
Step 1: Accessing the GitHub Readme
To make it easier for you to follow along, I have compiled all the instructions in a detailed GitHub readme file. You can find the link to this file in the description and comment section of the video. If you haven't watched my main tutorial, you'll also find a link to it in the readme file.
Step 2: Creating a RunPod Account
If you don't have a RunPod account, you'll need to register by following the provided link in the readme file. Additionally, I have an informative RunPod tutorial that covers the basics, in case you're new to this platform. It's a great resource for gaining valuable insights into using RunPod effectively.
Step 3: Navigating the RunPod Interface
Once you've logged into your RunPod account, access the community cloud. If you prefer, you can also utilize the secure cloud option. For the purpose of this tutorial, we'll be using the RunPod Stable Diffusion web UI template, which allows simultaneous usage of Roop and Stable Diffusion with Automatic1111 on the same RunPod. Choose the RunPod that suits your needs, such as A5000 or RTX3090. I recommend selecting a RunPod with a capacity of over 20 gigabytes, and in this case, we'll use the RTX 3090.
Step 4: Selecting the Template and Customizing Deployment
Make sure to select the RunPod Stable Diffusion web UI template by typing "stable" in the search bar. The template version may vary at the time of watching the video, but it should still work. If there are any updates, I will promptly update the readme file. Customize the deployment by setting the container disk to 15 gigabytes. You can adjust the volume disk according to your preferences. Set any necessary overrides and proceed with the deployment.
Step 5: Manual Installation of Roop
To demonstrate the installation process, I will cover both manual and automatic installation methods. Let's start with the manual installation. Connect to the manual installation RunPod by clicking on the connect icon and selecting "connect JupyterLab." This will take you to the RunPod JupyterLab interface, where you'll find the clear instructions for each step. We'll begin by cloning the Roop repository into our workspace. Open a terminal and copy-paste the provided command.
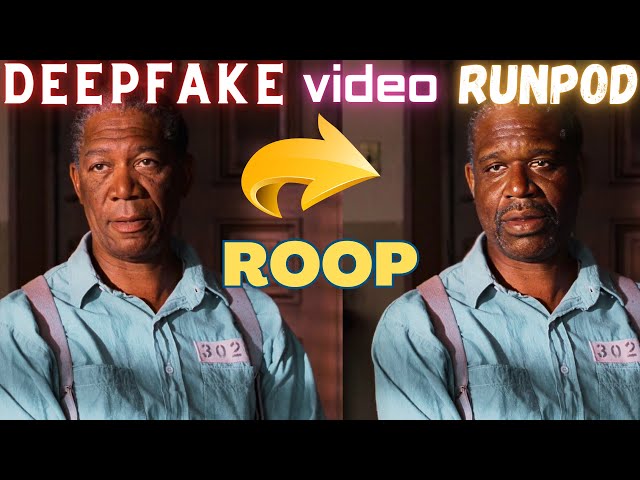
Used video footage is from The Shawshank Redemption (1994) in a transformative way for educational and research purposes.
-
00:00:00 Greetings everyone.
-
00:00:01 In this tutorial, I will show you how to install and use famous Roop
-
00:00:07 DeepFake open source library on a RunPod.
-
00:00:09 As some of you may already know, I have this
-
00:00:12 amazing tutorial on how to use it on Windows or Google
-
00:00:15 Colab for free.
-
00:00:17 Today I received a request
-
00:00:19 from one of my Patreon supporters for a RunPod tutorial and here we are.
-
00:00:24 I have prepared an
-
00:00:25 amazing step-by-step GitHub readme file so it
-
00:00:29 will be very easy for you to follow my steps
-
00:00:32 and install and run it on a RunPod very easily.
-
00:00:35 Moreover, I have prepared an amazing one-click
-
00:00:38 installer and shared it on my Patreon.
-
00:00:41 It is not necessary to use this for this tutorial,
-
00:00:45 but if you become my Patreon supporter and support
-
00:00:47 me on Patreon, I would appreciate that very much.
-
00:00:50 So all of the instructions are written on this GitHub
-
00:00:53 readme file.
-
00:00:54 I will put the link of this
-
00:00:55 file into the description of the video and also in the comment section of the video.
-
00:01:00 So if you haven't watched my main tutorial, there
-
00:01:04 are two links on the readme file.
-
00:01:06 First one will
-
00:01:07 open the other readme file for the main tutorial and
-
00:01:10 there is the link of that main tutorial video
-
00:01:13 here.
-
00:01:14 You can watch them.
-
00:01:15 You can also read this readme file.
-
00:01:16 If you don't have a RunPod account,
-
00:01:18 you can use this link to register.
-
00:01:20 Also, I have an amazing RunPod tutorial.
-
00:01:23 If you don't know how
-
00:01:24 to use RunPod, this will teach you a lot of information regarding how to use RunPod.
-
00:01:28 So let's go to our RunPod main interface.
-
00:01:31 Let's log in.
-
00:01:32 Okay, I have logged in into my RunPod.
-
00:01:34 Let's go to the community cloud.
-
00:01:36 You can also use secure cloud if you wish.
-
00:01:38 The one important thing is that I am going to
-
00:01:41 use RunPod Stable Diffusion web UI template.
-
00:01:45 So with this way, we will be able to use Roop and also Stable Diffusion
-
00:01:50 with Automatic1111 at the same time on the same
-
00:01:53 RunPod.
-
00:01:54 So pick your RunPod as you wish.
-
00:01:55 You can pick any of them.
-
00:01:56 I prefer over 20 gigabytes.
-
00:01:59 So either A5000 or RTX3090.
-
00:02:03 I will use RTX 3090.
-
00:02:05 Type here stable and you will get this template.
-
00:02:08 When you watch this video,
-
00:02:10 the version could be different.
-
00:02:11 Currently web automatic 8.0.3.
-
00:02:14 Even if it is higher version,
-
00:02:17 it should still work or I will update the readme file.
-
00:02:20 Customize deployment.
-
00:02:22 Make the container disk 15 gigabytes.
-
00:02:24 You can set the volume disk as you wish,
-
00:02:26 set overrides, and continue and deploy.
-
00:02:29 So in this pod, I will show manual installation.
-
00:02:31 Then I will also show automatic installation.
-
00:02:35 So let me start another pod.
-
00:02:36 It will be identical
-
00:02:38 and automatic installation is also starting as
-
00:02:41 another pod.
-
00:02:42 So let's connect to our manual
-
00:02:44 installation.
-
00:02:45 Click the connect icon here.
-
00:02:46 Click the connect JupyterLab.
-
00:02:48 So this is our main RunPod
-
00:02:50 JupyterLab interface.
-
00:02:51 Every step is very clearly written here.
-
00:02:55 We will begin with cloning the Roop
-
00:02:57 repository into our workspace.
-
00:02:59 Open a terminal here, copy paste the code.
-
00:03:01 The automatic RunPod
-
00:03:02 also started.
-
00:03:03 So to be able to use automatic installer, download the auto install SH file
-
00:03:09 from the Patreon post.
-
00:03:11 And this is the automatic installation RunPod interface.
-
00:03:15 Let's upload it
-
00:03:16 like this and open a terminal.
-
00:03:18 So for automatic installation, all you need to do is first
-
00:03:21 run
-
00:03:22 this command.
-
00:03:23 So I opened an interface, run that command.
-
00:03:26 You see the file is inside workspace
-
00:03:28 folder.
-
00:03:29 And the second command is this and it will install everything.
-
00:03:33 Let's continue to our
-
00:03:34 manual installation.
-
00:03:36 Now we will move into Roop of directory.
-
00:03:38 So I copy pasted the command.
-
00:03:40 I am using
-
00:03:41 this certain version.
-
00:03:43 Why?
-
00:03:44 Because as the authors of the Roop makes updates, it may get broken.
-
00:03:49 However,
-
00:03:50 if you want to use the latest version, skip this
-
00:03:52 step.
-
00:03:53 But for this video, I will use it.
-
00:03:55 So you
-
00:03:56 will also understand.
-
00:03:57 Now we are using this specific version, then we will make a new virtual
-
00:04:00 environment.
-
00:04:01 So it won't affect our other installations such as Stable Diffusion.
-
00:04:05 Okay,
-
00:04:06 the virtual environment is made, then we will activate
-
00:04:09 it like this, then we will install the
-
00:04:12 requirements with this command.
-
00:04:15 Automatic installation is going on itself.
-
00:04:17 This step is
-
00:04:18 also completed.
-
00:04:19 Now the next step, this will download the necessary model file into the
-
00:04:24 folder of Roop.
-
00:04:25 Because we are currently inside that folder.
-
00:04:28 The file is downloaded,
-
00:04:29 then we will install this one.
-
00:04:32 By the way, preparing this workflow took a lot of time of me.
-
00:04:35 Then this one.
-
00:04:36 Copy it.
-
00:04:37 It has asked me to continue.
-
00:04:39 So I click Yes, then I copy paste the new prompt.
-
00:04:43 It also asked me to proceed.
-
00:04:45 Yes, then this one.
-
00:04:47 Do not skip any of the steps.
-
00:04:49 Otherwise,
-
00:04:50 it will probably not work.
-
00:04:52 And most crucial part is this one.
-
00:04:55 For this I have spent a lot of time
-
00:04:57 and one of our Discord members helped.
-
00:05:00 So I appreciate his help.
-
00:05:01 He is this guy who helped
-
00:05:03 me to get that command.
-
00:05:05 Meanwhile, the automatic installation is completed.
-
00:05:08 So it is ready to use.
-
00:05:10 I have uploaded my face and image files into the automatic installation
-
00:05:15 Run Pod.
-
00:05:16 So I will move them into the necessary folder.
-
00:05:19 After the automatic installation has been completed.
-
00:05:22 Move inside the Roop folder,
-
00:05:23 start a new terminal here, activate it with this
-
00:05:27 command, and then use this command to
-
00:05:30 generate your deep fake video.
-
00:05:33 Don't forget to upload your files into Roop folder and change
-
00:05:37 your image and video file names.
-
00:05:40 So the automatic installation is currently processing the file,
-
00:05:45 extracting the video frames right now.
-
00:05:47 Video frames are being extracted into this folder,
-
00:05:50 which is the name of the video file.
-
00:05:53 2160 frames are extracted.
-
00:05:56 Now it is starting processing.
-
00:05:57 Okay, you see it is processing about 20 frames, 24 frames per second.
-
00:06:04 So 2160 frames will be
-
00:06:06 completed in under two minutes.
-
00:06:09 Let's continue our manual installation.
-
00:06:12 As a next step,
-
00:06:13 we will execute this line.
-
00:06:14 This is very important.
-
00:06:15 Otherwise it won't work.
-
00:06:16 Click it.
-
00:06:17 Yes, the automatic installation pod has A5000 as
-
00:06:21 a GPU and the manual installation has RTX 3090.
-
00:06:25 So the speed you are going to get will depend on what GPU you have selected in your RunPod.
-
00:06:31 Let's say you want to download your frames.
-
00:06:34 So to do it, I will open a new terminal inside the
-
00:06:37 row
-
00:06:38 up folder.
-
00:06:39 I will type runpodctl send and the frames folder name, video3, and it will
-
00:06:44 automatically zip all of them 2160 frames in my
-
00:06:49 case.
-
00:06:50 Copy this link, make a new folder wherever
-
00:06:52 you want to download like here.
-
00:06:54 Example, enter inside folder, open CMD and copy paste the
-
00:06:59 link
-
00:07:00 and it will download very fast all of the frames
-
00:07:02 you see.
-
00:07:03 This is not the case in Google Colab.
-
00:07:05 This is the advantage of RuınPod.
-
00:07:08 Meanwhile, manual installation is also completed.
-
00:07:11 Now there is some
-
00:07:12 information I have put to the readme file, please
-
00:07:14 read this file.
-
00:07:15 This is really important.
-
00:07:17 Then we
-
00:07:18 will use this command to activate on our RunPod.
-
00:07:20 Open a new terminal we are in the manual installation.
-
00:07:24 It is activated.
-
00:07:25 By the way, we need to move inside Roop folder.
-
00:07:28 So cd roop like this.
-
00:07:30 Now I am inside roop folder.
-
00:07:32 This is really important.
-
00:07:33 You need to be inside roop folder
-
00:07:35 and you need to have virtual environment activated.
-
00:07:38 Video frames are downloaded.
-
00:07:40 Let me show you them.
-
00:07:42 So in here we can see the face swapped frames.
-
00:07:44 Let me open them.
-
00:07:46 And you see the face is swapped like this.
-
00:07:49 The quality won't be very good, but we can use
-
00:07:51 CodeFormer to improve quality.
-
00:07:53 I will also show that.
-
00:07:54 Okay, so our manual installation is also
-
00:07:57 ready.
-
00:07:58 Now I need to upload my files for uploading files.
-
00:08:01 I will use runpodctl, open a command line.
-
00:08:04 For example, I will upload video3 runpodctl send video3.mp4.
-
00:08:10 It will give me a link.
-
00:08:13 Copy paste this inside roop folder like this.
-
00:08:16 When you're inside roop folder, it will upload
-
00:08:18 from your computer into your directory.
-
00:08:22 Alternatively, you can just drag and drop
-
00:08:25 whatever you want like here and it will upload, but
-
00:08:27 this will be much more slow.
-
00:08:30 And don't forget
-
00:08:31 to put them inside this main roop folder.
-
00:08:34 So in my roop folder now.
-
00:08:35 I have video3.mp4
-
00:08:38 and face2.
-
00:08:39 And I have already a command for that.
-
00:08:42 So I will just execute it like this.
-
00:08:44 And it should work.
-
00:08:45 I know the reason why it didn't work.
-
00:08:48 Because we have started this
-
00:08:50 virtual environment in the incorrect folder.
-
00:08:53 So this was a mistake I have made.
-
00:08:55 So let me show
-
00:08:56 you one more time.
-
00:08:57 So enter inside roop folder, open a terminal, copy this command and execute
-
00:09:02 it
-
00:09:03 while you're inside roop folder, not inside workspace.
-
00:09:06 Then let's copy our command and hit
-
00:09:09 enter.
-
00:09:10 You see, you may also make similar mistakes like I do.
-
00:09:14 So I am showing you these mistakes as
-
00:09:16 well that you will be able to solve them if you
-
00:09:18 encounter them.
-
00:09:19 This is our manual installation
-
00:09:20 folder.
-
00:09:21 We already have demonstrated how to use it inside.
-
00:09:25 Automatic installation.
-
00:09:26 So if you don't
-
00:09:27 know how to use runpodctl as I said, watch this
-
00:09:30 tutorial.
-
00:09:31 This readme file link will be in the
-
00:09:33 description.
-
00:09:34 And the best part of my workflow is that you can use also Stable Diffusion Automatic1111
-
00:09:40 web UI.
-
00:09:41 For example, on automatic, let's connect to the 3000 port.
-
00:09:44 Our web UI has started.
-
00:09:47 Let's go
-
00:09:48 to the extras and in here we have batch from directory.
-
00:09:51 Let's copy the frames folder path,
-
00:09:54 right, click copy path, paste the input directory here,
-
00:09:57 put a backslash to the beginning.
-
00:09:59 Let's type
-
00:10:00 codeformer video 3 and I want upscale.
-
00:10:04 As an upscaler you can also download other upscales.
-
00:10:07 Let's choose R-ESGRAN 4x+ and I will make the
-
00:10:11 CodeFormer visibility 1 and CodeFormer
-
00:10:14 weight 1.
-
00:10:15 So this will restore the faces.
-
00:10:17 However, I prefer another upscaler.
-
00:10:20 For example,
-
00:10:21 there is this model database.
-
00:10:22 I added the link to the very bottom.
-
00:10:24 And in here look for ultra
-
00:10:26 sharp 4x plus.
-
00:10:28 You will see the link like this when you search.
-
00:10:30 Click it.
-
00:10:31 It will open a mega
-
00:10:33 folder for you, download it into your computer then
-
00:10:36 upload into necessary folder.
-
00:10:39 I will show.
-
00:10:40 So this is the file you need 4x ultra sharp dot
-
00:10:44 pth file.
-
00:10:45 Let's download it.
-
00:10:46 Right click.
-
00:10:47 Download.
-
00:10:48 I wonder if we can directly download into our RunPod.
-
00:10:50 So get a link.
-
00:10:52 Probably not.
-
00:10:53 Yeah, let's try with
-
00:10:54 wget.
-
00:10:55 So this file will get into workspace.
-
00:10:58 Stable Diffusion.
-
00:10:59 In here you will see models.
-
00:11:02 You will see
-
00:11:03 ESRGAN folder, open a new terminal here and let's try
-
00:11:08 wget and the link.
-
00:11:10 Okay, it didn't work.
-
00:11:11 So we
-
00:11:12 need to upload from our computer.So it is inside
-
00:11:14 my downloads folder.
-
00:11:15 Open a new cmd, runpodctl
-
00:11:18 send the file name.
-
00:11:20 Now I have uploading link and let's type it so it will download the model
-
00:11:26 into
-
00:11:27 RESGRAN folder.
-
00:11:29 Then after I restart my web ui.
-
00:11:30 I will be able to use that upscaler from here.
-
00:11:35 So
-
00:11:36 let's hit generate.
-
00:11:37 It will first download the code former model.
-
00:11:41 Actually we should be able to see it
-
00:11:43 in the logs I think.
-
00:11:44 Oh it doesn't show in the logs but first it will download.
-
00:11:48 Then it will start
-
00:11:49 generating the CodeFormer processed images.
-
00:11:53 Let's look at it inside our given path which will
-
00:11:57 be inside roop and then let's see maybe we are
-
00:12:01 in the incorrect place.
-
00:12:03 We said it will be here
-
00:12:04 I think it still didn't start.
-
00:12:06 This will take huge time by the way.
-
00:12:08 So you should start your web ui
-
00:12:11 manually and watch the progress in the cmd.
-
00:12:14 I explain all of them in my channel.
-
00:12:17 Okay, the
-
00:12:18 folder generated so it started processing.
-
00:12:20 Now we will see the face much better.
-
00:12:23 Afterwards you
-
00:12:24 need to compose your video from this processed frames.
-
00:12:27 I explained that in the main video you
-
00:12:31 will find the link here.
-
00:12:32 So this is how you can use RunPod for roop deepfake.
-
00:12:37 All of the links will
-
00:12:38 be in this file.
-
00:12:39 I hope you have enjoyed.
-
00:12:41 Please like subscribe, leave a comment share.
-
00:12:43 Please
-
00:12:44 support me on Patreon.
-
00:12:45 It helps me tremendously.
-
00:12:47 You can also join my youtube channel and also
-
00:12:49 support me by joining.
-
00:12:51 The link for the readme file will be in the description of the video like
-
00:12:54 here.
-
00:12:55 Also, you will find the link like here in the
-
00:12:58 pinned comment section.
-
00:12:59 So hopefully see you
-
00:13:00 in another amazing tutorial video.