In this article, I want to break down the key fundamentals of networking technologies that I consider essential for working in cybersecurity, with detailed explanations and examples. This article turned out to be quite extensive, but I tried to cover only the key and important points.
- Introduction
- URL Structure
- HTTP Request Lifecycle
- HTTPS: Securing the Channel
- Anatomy of HTTP Request and Response
- HTTP Methods and Status Codes
- cURL: Quick Reconnaissance from Terminal
- DevTools: Quick Audit from Browser
- GET Requests in Practice
- POST Requests
- Conclusion
Let's start with the basics: today, most applications we use constantly interact with the internet - both web and mobile. Most of these communications go through web requests using the HTTP (HyperText Transfer Protocol) - an application protocol for accessing World Wide Web resources. The term "hypertext" refers to text containing links to other resources that can be easily interpreted by client programs.
HTTP architecture is built on the client-server model: the client initiates a request, the server processes it and returns a resource. HTTP communication always involves these two parties: the client requests a resource, the server delivers it. The default port is 80, but web server configuration can specify any other port.

A URL provides significantly more capabilities than simply specifying a domain. Let's examine its components:

| Component | Example | Purpose |
|---|---|---|
Scheme |
http://, https:// |
Protocol for server interaction. Ends with the :// delimiter |
User Info |
admin:password@ |
Credentials for HTTP authentication in login:password format. Separated from host by @. Transmitted in plain text - not recommended |
Host |
example.com |
Server address - domain name (FQDN) or IP address |
Port |
:80 |
Connection port. Default: 80 for HTTP, 443 for HTTPS. Can be omitted for standard ports |
Path |
/dashboard.php |
Path to resource on server. If absent, index file is requested (usually index.html) |
Query String |
?login=true |
Request parameters in key=value format. Starts with ?, parameters separated by & |
Fragment |
#status |
Anchor for in-page navigation. Processed by browser, not sent to server |
Required components are scheme and host. All other elements are optional.
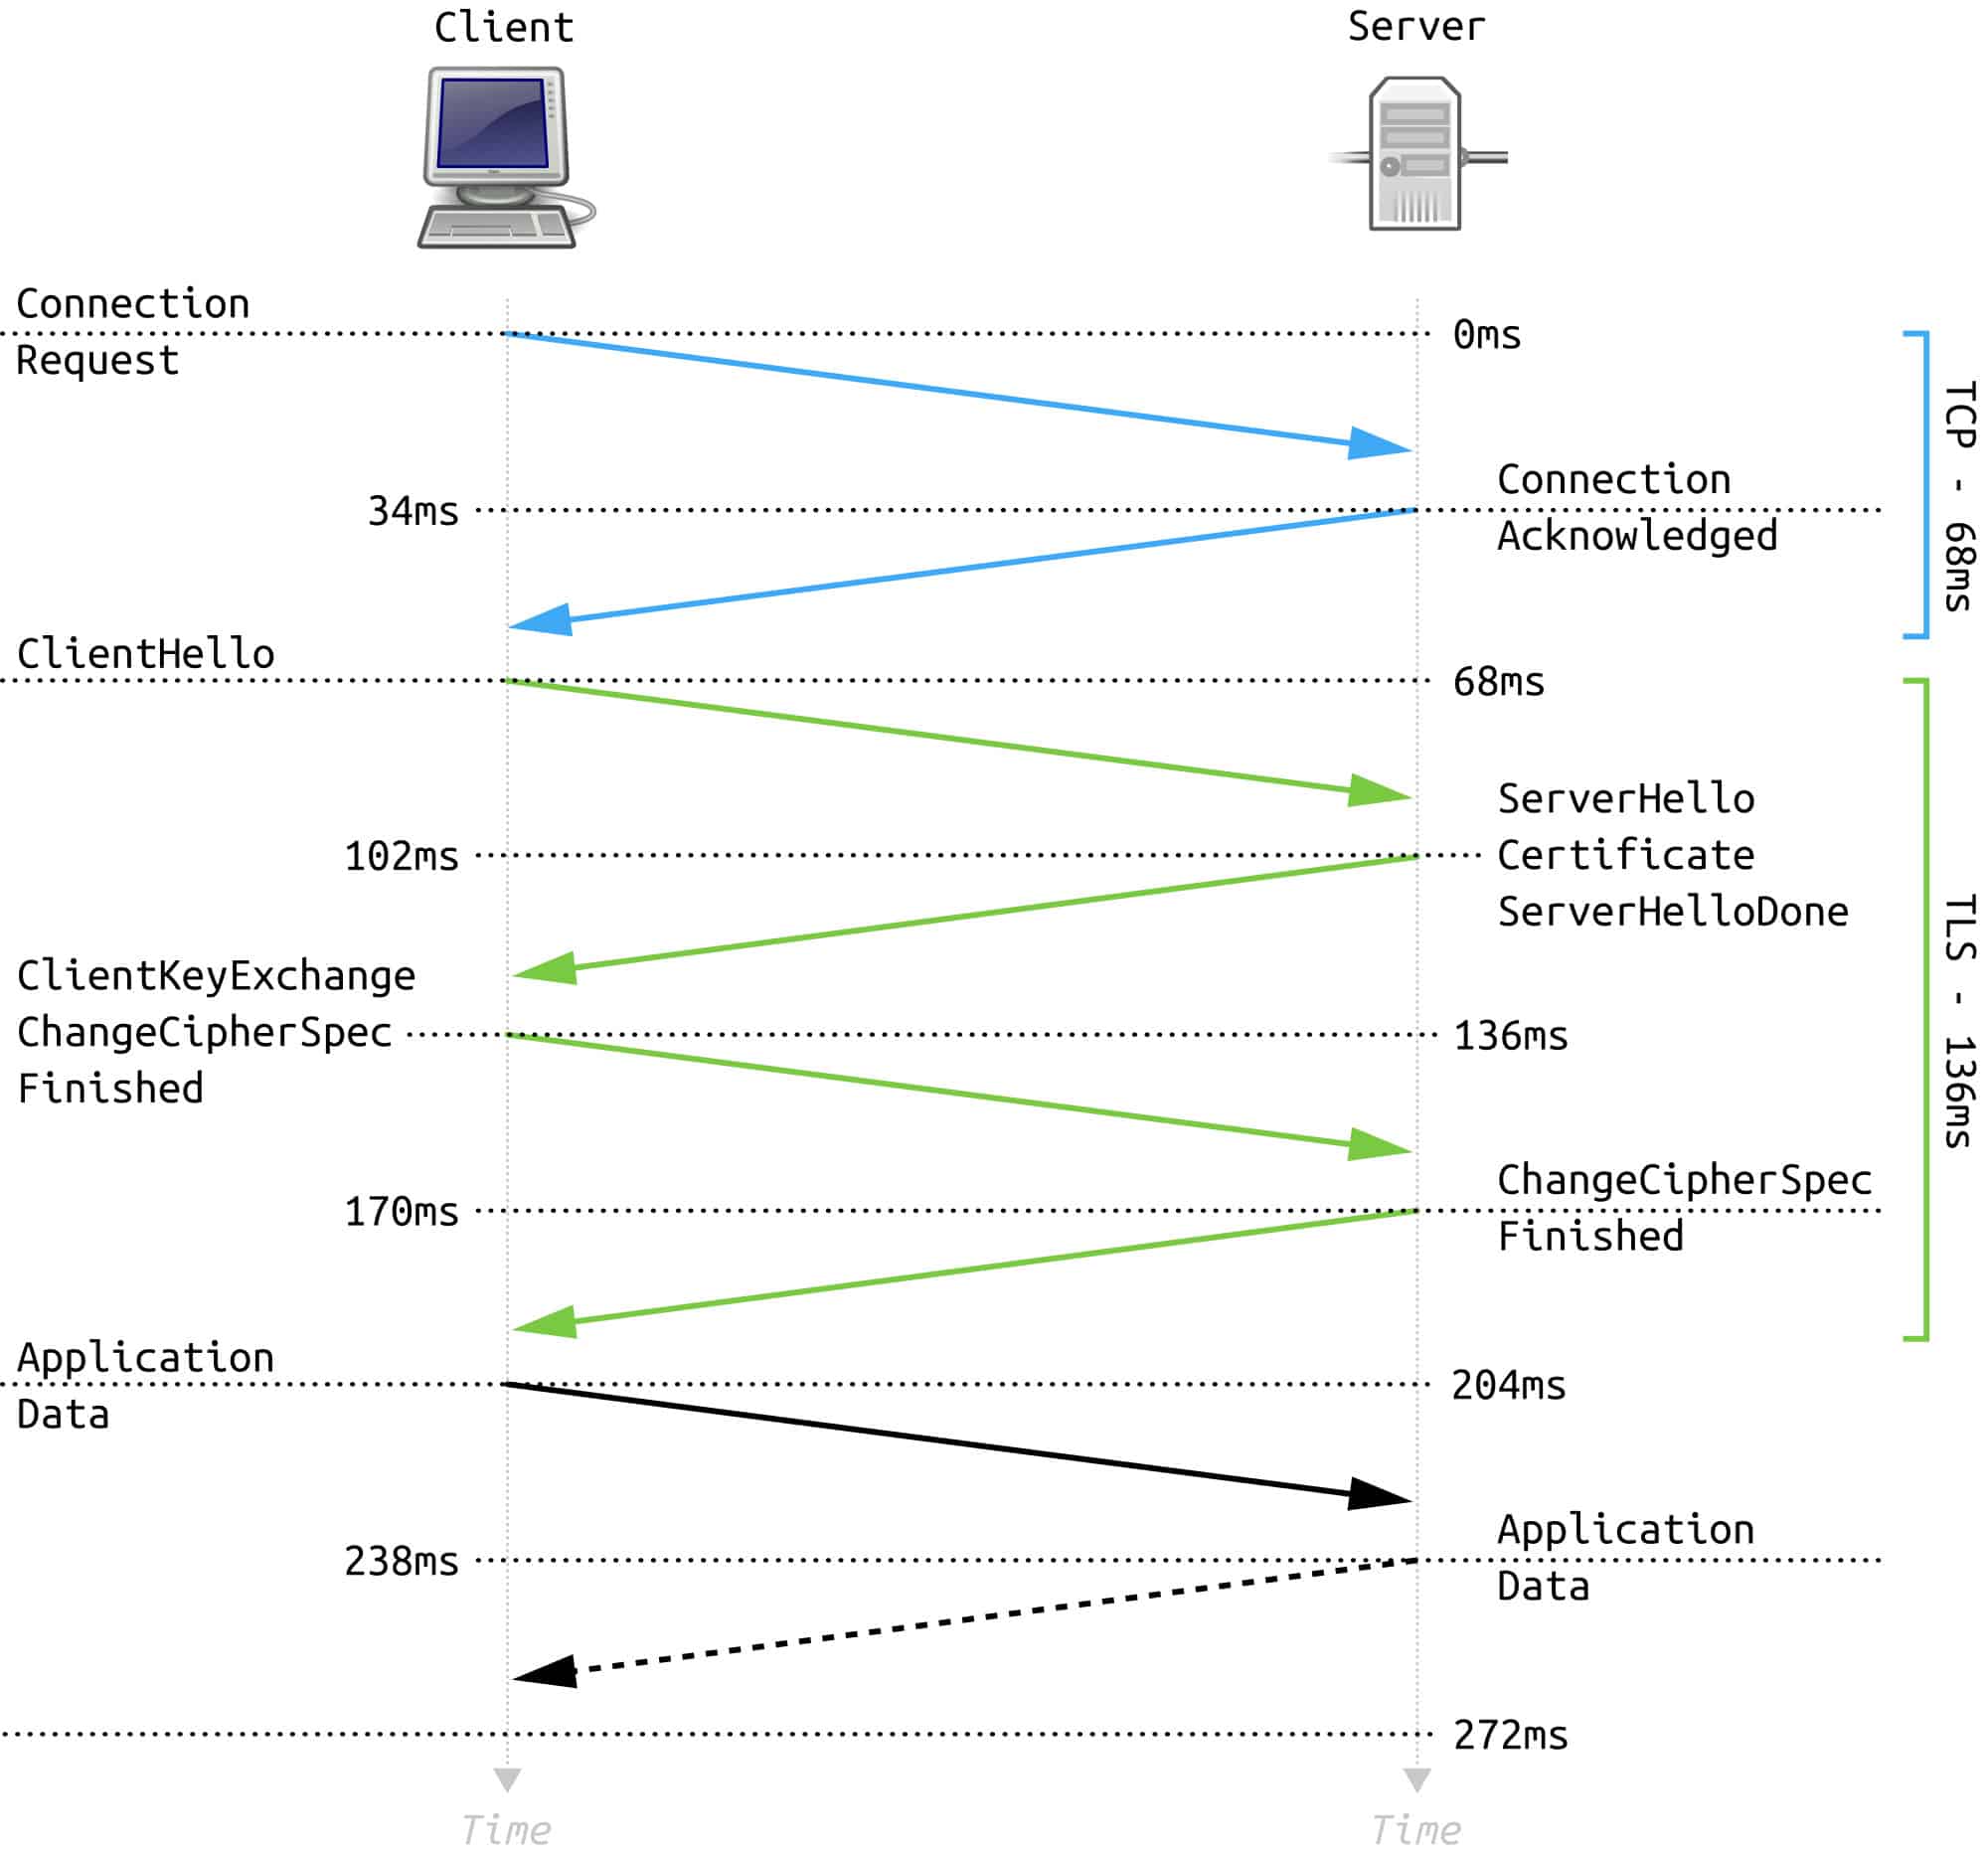
The diagram below shows a generalized HTTP request flow. When a user first enters a URL in the browser, it contacts a DNS server (Domain Name System) to resolve the domain and obtain the corresponding IP address.
For example, for the domain example.com, DNS might return IP address 198.51.100.42. The DNS server finds the needed IP and returns it to the client. Any domain name must go through this resolution procedure, otherwise the server simply won't know where to send the response.

When accessing a web resource, the following sequence occurs (with cache, TCP/TLS, and HTTP details):
- The browser sends a DNS query to resolve the domain name. First, browser and OS local caches are checked, then the
/etc/hostsfile, then the system resolver. The response is cached for the TTL duration. Instead of UDP/53, DoH/DoT (DNS over HTTPS/TLS) is increasingly used. - After receiving the IP, the client establishes a TCP connection with the server (port
80for HTTP or443for HTTPS): three stepsSYN->SYN-ACK->ACK. - If HTTPS is used, TLS handshake follows immediately after TCP: the client specifies the domain via SNI, negotiates the protocol (ALPN:
http/1.1,h2,h3) and verifies the server certificate. - The browser sends an HTTP request (
GET / HTTP/1.1) with key headers:Host,User-Agent,Accept,Accept-Encoding,Cookie,Cache-Control. For HTTPS, this data is already transmitted inside the encrypted channel. - The response may come from the nearest node on the path: CDN/proxy/load balancer or origin server. The server returns a status code (2xx/3xx/4xx/5xx), body (e.g.,
index.html), caching headers (Cache-Control,ETag,Last-Modified), redirects,Set-Cookie, and compression (Content-Encoding: gzip/br). - The browser processes the response: renders HTML, loads additional resources (CSS/JS/images/fonts), may open multiple TCP/TLS connections or use HTTP/2/3 multiplexing. Cached responses can be reused or validated (304 Not Modified).
Note on DNS: The browser first checks the local
/etc/hostsfile for a domain record. This allows manual DNS resolution by adding lines inIP domainformat.
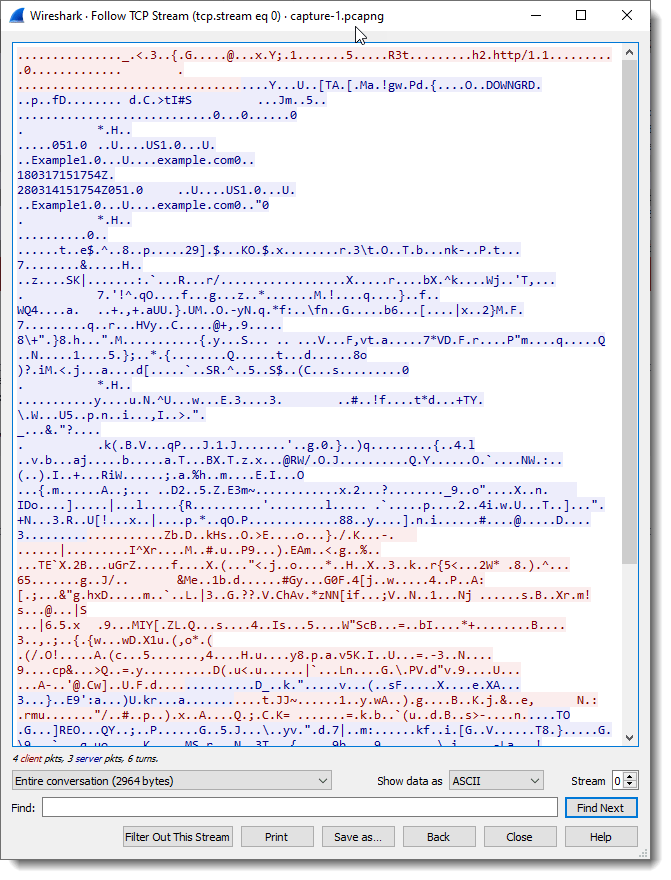
HTTP is convenient for clear examples and debugging, but it has a critical drawback: all traffic is transmitted in plain text. Anyone positioned between client and server (public Wi-Fi, compromised router, malicious ISP) can perform a MITM attack (Man-in-the-Middle), intercept logins, passwords, session tokens, and request contents. In mild cases, this results in tracking and statistics collection; in severe cases - account hijacking and server response spoofing. This is exactly the problem that switching to HTTPS solves.

With HTTPS (essentially the same HTTP, but over TLS), the payload becomes unreadable: request and response bodies are encrypted with a session key, and the interceptor sees only a stream of encrypted bytes, not logins, passwords, or JSON. In a sniffer, this looks like "gibberish" in the stream analysis window - without keys, decrypting such traffic is impossible:
One obvious sign of a secure channel is the https:// prefix in the address bar and the lock icon (or other security indicator) next to the domain. In most modern browsers, clicking this icon opens a popup with certificate information, encryption level, and site permissions; if something is wrong with the certificate, warnings will appear here.
A small nuance: even with HTTPS, the domain is revealed if DNS queries go unencrypted. In production networks, it's better to enable DoH/DoT or route traffic through a VPN to avoid exposing what you're browsing.
If you enter http:// for a site that actually expects HTTPS, the browser first makes a regular HTTP request on port 80. The server responds with a redirect 301 Moved Permanently (sometimes 308 Permanent Redirect) to the same resource, but now via https:// and port 443. After this, the TLS handshake begins: the client sends Client Hello with supported versions and cipher suites, the server responds with Server Hello and certificate, parties exchange keys and verify chain validity. Only after successful handshake completion does regular HTTP begin working over this encrypted channel - now as HTTPS.
An attacker could theoretically attempt a downgrade attack and substitute HTTPS with HTTP through their proxy, forcing the client to stay on the unprotected scheme. But modern browsers and servers try to counteract this: HSTS, preload lists, disabling old TLS versions, and strict cipher policies significantly complicate such attacks.
To understand what exactly goes over the network, it's useful to examine raw packets. Here's an example of a GET request:

The first line consists of three space-separated fields:
| Field | Example | Meaning |
|---|---|---|
| Method | GET |
Verb describing the action (get, send, delete...). |
| Path | /users/login.html |
Specific resource; query like ?username=user goes here too. |
| Version | HTTP/1.1 |
Protocol version the server expects. |
Next come "header: value" pairs (Host, User-Agent, Cookie, Accept, and dozens of others). Headers are terminated by an empty line, after which the request body may follow (form, JSON, file).
If something goes wrong during brute-forcing or testing, the server often responds with 400 Bad Request or just stays silent - and it's not always clear why. In my experience, one of the most common errors is missing the empty line (\r\n\r\n) between headers and request body. Without it, the server can't understand where metadata ends and data begins. Other common problems: extra spaces in headers, incorrect URL encoding of special characters, or broken Content-Length. If a request silently fails - first thing I check is the structure in a hex editor or via curl -v to see what's actually being sent to the server.
HTTP response is structured similarly:

The first line contains protocol version and status (200 OK, 404 Not Found, etc.). Then come headers (Date, Server, Set-Cookie, Content-Type, body length). After an empty line - the body itself: HTML, JSON, image, PDF, or any other content the server is configured for.
A small detail about versions: HTTP/1.x is human-readable text, fields separated by \r\n. HTTP/2 is already binary and looks different on the wire, though request/response logic is preserved.
For pentesters, this matters: in Wireshark, HTTP/2 and HTTP/3 can't simply be read as text - you need a decoder. However, Burp Suite and mitmproxy automatically parse the binary format and show requests in familiar form. Another nuance is multiplexing: in HTTP/2, multiple requests go over one connection in parallel, which complicates timing analysis and race condition attacks. HTTP/3 works over QUIC (UDP), which adds its own peculiarities: connections are harder to intercept and proxy.
The method in the first request line tells the server what we want to do, and the response code shows how the server handled the attempt. In curl -v, the method is immediately visible (GET / HTTP/1.1), and in browser DevTools it's the Method column.
Most commonly encountered:
| Method | What it does | What to look for when testing |
|---|---|---|
GET |
Retrieve resource. Parameters in query (?param=value). Cacheable, doesn't change state. |
IDOR via ID substitution in parameters, data leakage in URL and logs, authorization bypass. |
POST |
Send data in body: text, JSON, files. Forms, logins, uploads. | Injections (SQL, XSS), missing CSRF token, mass assignment, shell uploads. |
HEAD |
Headers only, no body. Reconnaissance before downloading. | Information leakage in headers, content size check bypass. |
PUT |
Create or replace entire resource. Idempotent. | Arbitrary file write, config overwrite, unauthenticated upload. |
DELETE |
Delete resource. Idempotent. | IDOR for deleting others' data, DoS via mass deletion. |
OPTIONS |
What methods does server support. Returns CORS and Allow. |
Available methods reconnaissance, improper CORS configuration. |
PATCH |
Partial resource changes. Not idempotent. | Mass assignment, modifying others' data, privilege escalation. |
Methods depend on application configuration. In REST APIs, the GET/POST/PUT/DELETE quartet is most common, but when testing I always try OPTIONS to quickly understand what's actually allowed.
HTTP code classes show the overall result:
| Class | Meaning |
|---|---|
1xx |
Informational about processing progress. |
2xx |
Request successfully completed. |
3xx |
Client asked to go to different address. |
4xx |
Problem with the request (wrong URL, format, permissions). |
5xx |
Server itself couldn't process the request. |
Examples by class:
| Code | Comment |
|---|---|
200 OK |
Request completed successfully, body usually contains the resource. |
302 Found |
Temporary redirect, browser will navigate to new URL. |
400 Bad Request |
Invalid request: e.g., missing line break. |
403 Forbidden |
No access; sometimes caused by WAF blocking suspicious request. |
404 Not Found |
Resource doesn't exist. |
500 Internal Server Error |
Internal server error - worth investigating further. |
When I get a 403/401 code, I immediately check if there's strict binding to headers or method. Sometimes just switching GET to POST or adding X-Forwarded-For suddenly opens the resource.
Several codes are particularly interesting when testing:
401vs403- if the server returns401for non-existent resources and403for existing ones, this allows enumerating hidden endpoints.500 Internal Server Error- often accompanied by stack trace or debug information. Check the response body: there may be file paths, table names, framework versions.302/301to login page - reveals protected endpoints. If/adminredirects to/login, then/adminexists.405 Method Not Allowed- server says method isn't supported, but the endpoint itself exists. Try other methods.429 Too Many Requests- rate limiting. Useful to know the threshold for brute-forcing and bypass.
For manual checks and automation, it's convenient to use cURL (client URL) - a CLI utility and library that understands many protocols besides HTTP. Its advantages for pentesters: scriptability, header control, and ability to quickly compare responses without a full browser. Plus, you can easily inject cookies/tokens or hide behind proxies via flags, instantly comparing response differences.
Basic request:
curl example.comDownload page or file preserving remote resource name:
curl -O example.com/index.htmlSilent mode to hide progress bar and service messages:
curl -s -O example.com/index.htmlA few options that often help:
-i- include response headers;-v- verbose request/response breakdown (useful for debugging);-o <file>- explicitly specify output filename;-u user:pass- pass simple HTTP authentication.
When you need to see the entire protocol, add -v:
curl example.com -vOutput will show what exactly the client sent (GET / HTTP/1.1, Host, User-Agent) and what the server returned (status line, headers, body). If you get 401 Unauthorized or a redirect, it's immediately visible. Triple verbose (-vvv) additionally reveals TLS details and minor connection nuances.
For a complete list of flags, you can run curl --help all or read man curl. Even brief familiarity with them noticeably speeds up routine web resource checking.
When working over HTTPS, curl performs the TLS handshake itself and verifies certificates. If the signature chain is broken or a self-signed certificate is used, the utility will terminate the connection - this is normal MITM protection:
user@linux:~$ curl https://example.com

curl: (60) SSL certificate problem: Invalid certificate chain
More details here: https://curl.haxx.se/docs/sslcerts.html
...SNIP...
Browsers behave the same way and complain about untrusted certificates. In training labs or when testing local services, you can temporarily ignore verification with the -k flag:
user@linux:~$ curl -k https://www.example.com

<!DOCTYPE HTML PUBLIC "-//IETF//DTD HTML 2.0//EN">
<html><head>
...SNIP...Virtually every modern browser has developer tools. In Chrome/Firefox, you can open them with CTRL+SHIFT+I or F12, and for network tasks we need the Network tab.
When refreshing the page, a list of requests appears there: response status, method, domain, path, and size. If the page pulls hundreds of resources, the Filter field helps - it's easy to find the URL or content type you're interested in.
Clicking on a request, you can view the Headers, Response, and Cookies tabs. In Response there's a toggle for raw view to see original HTML/JSON without rendering. It's essentially a free sniffer that's always at hand.
A killer feature for pentesters - Copy as cURL. Right-click any request -> Copy -> Copy as cURL - and you have a ready command in clipboard with all headers, cookies, and body. Paste into terminal, change parameters, send - ideal for quick testing without proxy setup. Chrome also has Copy as Fetch for reproducing requests directly in the browser console.
More useful tricks:
Preserve log- keep requests when navigating between pages (otherwise the list clears);Disable cache- disable cache to see real requests to server;- filter
method:POSTorstatus-code:500- quickly find interesting requests in a large stream.
We've covered HTTP theory, but it's interesting to see what the most basic scenario looks like - a simple link click - from a pentester's or developer's perspective.
When we type an address in the browser bar and press Enter, the client sends a GET request to the server: asking to return an HTML document, then as the page code is parsed, it loads scripts, styles, fonts, images, and API requests - also mostly via GET or POST.
This is clearly visible in the Network tab: our single click turns into a whole "fan" of requests to different URLs. This view is especially useful during audits and bug bounties: it becomes clear which endpoints actually exist in the application and what parameters it accepts.
Sometimes access to a section is restricted not by a login form on the page itself, but by built-in web server authentication - HTTP Basic Auth. The browser in this case shows a system "Enter login/password" dialog, and credential verification is done not by the application, but by Apache or nginx, for example.
Imagine that at /reports/ there's an internal admin panel and the web server protects it with Basic Auth. If we access it without authorization, we'll see a typical picture:
user@linux:~$ curl -i https://intranet.example.com/reports/

HTTP/1.1 401 Unauthorized
Date: Mon, 01 Dec 2025 10:00:00 GMT
Server: Apache
WWW-Authenticate: Basic realm="Internal reports"
Content-Length: 16
Content-Type: text/plain; charset=utf-8

Authorization required- code
401indicates access is denied without authentication; - the
WWW-Authenticateheader tells the client that the server expects Basic Auth and what the protected area (realm) is called.
Now let's send the same request but with login and password, e.g., security:Winter2025!:
user@linux:~$ curl -u security:Winter2025! https://intranet.example.com/reports/

<!DOCTYPE html>
<html lang="en">
<head>
  ...SNIP...
This time we have access. Adding the -v flag shows what header actually goes to the server:
user@linux:~$ curl -v -u security:Winter2025! https://intranet.example.com/reports/ 2>&1 | sed -n '1,15p'
> GET /reports/ HTTP/1.1
> Host: intranet.example.com
> Authorization: Basic c2VjdXJpdHk6V2ludGVyMjAyNSE=
> User-Agent: curl/8.5.0
> Accept: */*
The string after Basic is simply base64 of security:Winter2025!. There's no encryption here, so Basic Auth only makes sense over HTTPS.
The same effect can be achieved by setting the header manually:
user@linux:~$ curl -H 'Authorization: Basic c2VjdXJpdHk6V2ludGVyMjAyNSE=' https://intranet.example.com/reports/Now let's look at a typical scenario with GET parameters. Suppose after logging into the admin panel there's a report search bar. The user enters text, and the frontend sends an API request, e.g.:
https://intranet.example.com/api/reports?query=fraud&limit=5
Everything after ? is the query string. Here there are two parameters:
query=fraud- search text;limit=5- maximum number of results.
If you open Network during the search, we'll see this full request and can reproduce it manually:
user@linux:~$ curl 'https://intranet.example.com/api/reports?query=fraud&limit=5' \
  -H 'Authorization: Basic c2VjdXJpdHk6V2ludGVyMjAyNSE='
The server will return JSON with results, and from there you can work not through the browser, but however you like: save responses, iterate through parameters, write small scripts for mass testing.
In the previous section, we looked at how GET is used to retrieve pages and make simple API requests. But as soon as you need to transmit login/password, upload a file, or simply remove sensitive parameters from the URL, POST almost always comes into play.
The key difference is simple:
GETpasses parameters in the query string (?param=valuein URL);POSTputs data in the HTTP request body.
This has several pleasant effects for developers and security professionals:
- parameters and files don't appear in web server logs and browser history as part of the URL;
- body can be binary (file uploads), only service delimiters need encoding;
- URL length limit (often ~2000 characters) no longer prevents transmitting large data structures.
Below we'll examine live scenarios: login forms, session cookies, and JSON API requests.
Unlike Basic Auth, where the browser draws a system login/password input window and sends the Authorization header, real applications most often use regular HTML forms. The user enters login/password, clicks the button - frontend sends POST to the authorization endpoint, e.g., /login.php or /auth.
A typical request body example that can be seen in Network -> Request tab:
username=analyst&password=LabPass123%21
The same is easy to reproduce manually via curl:
user@linux:~$ curl -X POST -d 'username=analyst&password=LabPass123!' https://portal.example.com/login.php

<!DOCTYPE html>
<html lang="en">
<head>
  <title>Analytics Portal</title>
  ...SNIP...
The options here are important:
-X POST- explicitly set the method (in many casescurlwill understand POST is needed once it sees-d, but explicit declaration is useful for readability);-d- form data inkey=value&key2=value2format (by defaultcurlsends them withContent-Type: application/x-www-form-urlencoded).
Many forms redirect after successful login, e.g., from /login.php to /dashboard. To not just catch the 302 response, it's convenient to add -L - then curl will follow the redirect chain:
user@linux:~$ curl -L -X POST -d 'username=analyst&password=LabPass123!' https://portal.example.com/login.phpAlmost any modern web application issues a session cookie to the client after login. This is how the server then understands that requests come from an authenticated user, not a guest.
Let's look at the response to the same request if we add -i to see headers:
user@linux:~$ curl -i -X POST -d 'username=analyst&password=LabPass123!' https://portal.example.com/login.php

HTTP/1.1 302 Found
Date: Mon, 01 Dec 2025 12:00:00 GMT
Server: nginx
Set-Cookie: SESSIONID=abf1329e7d904c9fa3c4c1b8f8c21d3a; Path=/; HttpOnly; Secure
Location: /dashboard
Content-Length: 0
Here we're interested in the line:
Set-Cookie: SESSIONID=abf1329e7d904c9fa3c4c1b8f8c21d3a; Path=/; HttpOnly; SecureThe server says: "From now on, all requests with cookie SESSIONID=... are considered bound to the logged-in session." We can take this value and use it in subsequent requests without logging in each time.
You can pass the cookie to curl in two ways:
Via -b:
user@linux:~$ curl -b 'SESSIONID=abf1329e7d904c9fa3c4c1b8f8c21d3a' https://portal.example.com/dashboardOr via explicit header:
user@linux:~$ curl -H 'Cookie: SESSIONID=abf1329e7d904c9fa3c4c1b8f8c21d3a' https://portal.example.com/dashboardIn the browser, the same can be done manually: open DevTools, Storage / Application tab -> Cookies, substitute your SESSIONID value and refresh the page. If the cookie is valid, you'll immediately be in the authenticated part of the interface.
An important security point: the browser automatically sends cookies to the corresponding domain with each request. This is convenient but creates a CSRF (Cross-Site Request Forgery) threat - an attacker can force the victim's browser to send a request to a vulnerable site, and the cookie will be attached automatically. That's why forms are protected with CSRF tokens and cookies are marked with the SameSite flag. But that's a topic for another article.
Forms are classic, but increasingly frontend communicates with backend directly via JSON API. In this case, the POST request body is no longer form-url-encoded but structured JSON, and the Content-Type header changes to application/json.
Imagine our portal has a city search, and frontend sends a request to /api/cities with each character input:
POST /api/cities HTTP/1.1
Host: portal.example.com
Content-Type: application/json
Cookie: SESSIONID=abf1329e7d904c9fa3c4c1b8f8c21d3a

{"q":"london","limit":5}
Such a request is easy to repeat manually:
user@linux:~$ curl -X POST \
  -H 'Content-Type: application/json' \
  -H 'Cookie: SESSIONID=abf1329e7d904c9fa3c4c1b8f8c21d3a' \
  -d '{"q":"london","limit":5}' \
  https://portal.example.com/api/cities

["London (UK)","London (CA)","London (NZ)"]
Three important points here:
- body is valid JSON (double quotes, no trailing commas);
Content-Type: application/jsontells the server how to parse the body;- cookie still handles authorization: without it backend may return
401or empty response.
In DevTools, such a request can be viewed and copied as Copy -> Copy as Fetch, then play with parameters on the fly in the browser console:
fetch('https://portal.example.com/api/cities', {
  method: 'POST',
  headers: {
    'Content-Type': 'application/json',
  },
  credentials: 'include',
  body: JSON.stringify({ q: 'os', limit: 10 }),
}).then(r => r.json()).then(console.log);We've covered some of the fundamentals of network protocols - HTTP and briefly touched on HTTPS. Thanks to everyone who read through, and good luck with your further learning or practice in cybersecurity!
This article is provided for educational purposes. Feel free to use and share with attribution.
Found an error or want to suggest improvements? Feel free to open an issue or submit a pull request.